[Arduino Uno] DC motor control
Created:
Updated:
DC motor
A DC motor is a device that converts direct current electrical energe into mechanical energy according to Fleming’s left-hand rule.
A DC motor is constructed by using a permanent magnet as a stator and a coil as a rotor(armature). When voltage is applied to the DC motor, current flows through the rotor, thereby generating a magnetic field, and these magnetic poles generate attractive and repulsive forces with the magnetic poles of the stator. So, the rotor rotates.
A DC motor can change the direction of rotation by changing the direction of currnet flow.
Since the operating conditions vary according to the DC motor, when selecting a motor, the specifications of the motor must be carefully reviewed, and a suitable motor driver must be selected accordingly.
motor driver
Microprocessors operate within a relatively small voltage/current range, while peripheral devices often operate in a relatively large voltage/current range. Since the motor also operates with a voltage/current that is greater than the voltage/current of the microprocessor, a device that can supply the voltage/current required for the motor to operate is required, and this is called a motor driver.
Motor drivers usually provide the ability to control the rotation direction and speed of the motor.
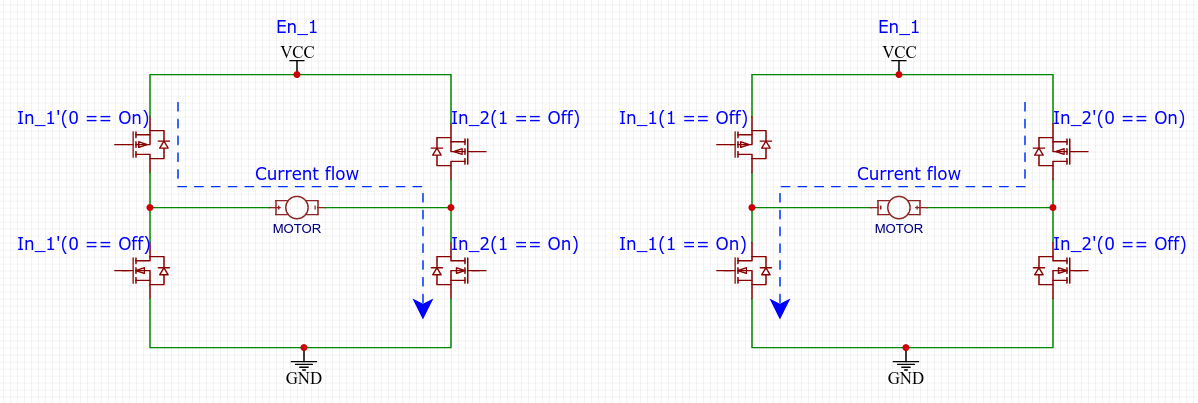
Direction of rotation control
DC motors usually have 2 ports that can be controlled, and the rotation direction of the motor changes depending on how the voltage is supplied to them(depending on the direction of the current). The direction of current flow changes according to the inputs of In_1 and In_2 in the H-bridge circuit of the form below.
The figure below is an example of H-bridge, and it can be configured in different forms.
Speed of rotation control
The speed of the motor can be controlled by chaning the level of the DC voltage supplied to the motor. Higher voltage increases speed, and the lower voltage decreases sppd. The voltage can be controlled using a PWM signal.
circuit
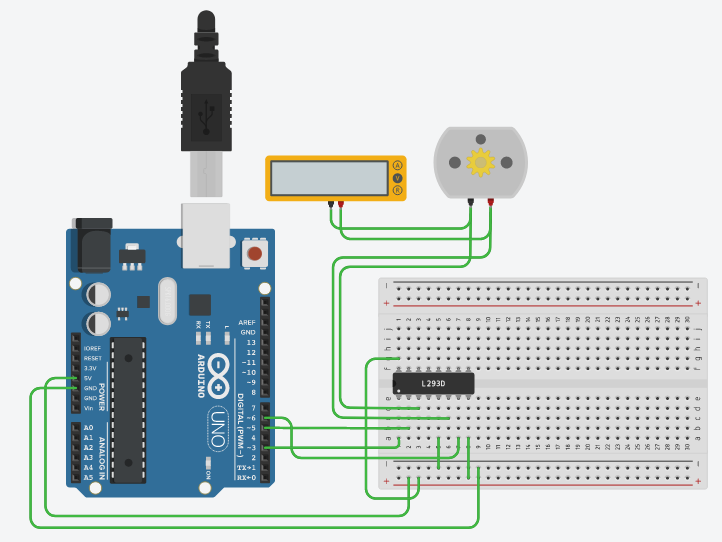
The following circuit is constructed using a arduino Uno and a L293D motor driver.
L293D’s 1Y(pin3) and 2Y(pin6) are connected to the two ports of the motor to change the direction of rotation of the motors, and the rotation speed of the motor is controlled by PWM signaly by connecting pins EN1,2 and pin3 of arduino.
The DC motor used here is a low-end motor and it can test basic operation.
The 5V power(USB power) of the arduino board was used for the power of the L293D. If a DC motor with a stronger rotational power(a motor that requires a large voltage/current use) is required, separate power supply should be used.
| Arduino pin number | L293D pin number | DC motor |
|---|---|---|
| 3 | 1(EN1,2) | |
| 5 | 2(1A) | |
| 6 | 7(2A) | |
| 5V | 8(Vcc2),16(Vcc1) | |
| GND | 5(GND) | |
| 3(1Y) | one of two ports | |
| 6(2Y) | one of two ports |
code
In the code below, the “increaseCount” is a variable to determine whether to increase or decrease the “count” variable, and the count variable from 0 to 255 is output to pin 3 of the arduino using the analogWrite() function. This controls the speed of the motor.
The behavior is as follows.
- The “count” increases from 0 to 255
- The “count” decreases from 255 to 0
- change the rotation direction of the motor
- repeat above 1 ~ 3
1
2
3
4
5
6
7
8
9
10
11
12
13
14
15
16
17
18
19
20
21
22
23
24
25
26
27
28
29
30
31
32
33
34
35
36
37
38
39
40
41
42
43
44
45
46
47
int motor_in_1 = 5;
int motor_in_2 = 6;
int motor_en_1 = 3;   //PWM to control motor speed
int count = 0;
bool increaseCount = 1;
bool direction = 0;

void setup()
{
  pinMode(motor_in_1, OUTPUT);
  pinMode(motor_in_2, OUTPUT);
  pinMode(motor_en_1, OUTPUT);
  Serial.begin(9600);
}

void loop()
{
  if (count >= 255) {
    increaseCount = 0;
  }
  else if (count <= 0) {
    increaseCount = 1;
    direction = !direction;

    if (direction) {
      digitalWrite(motor_in_1, HIGH);
      digitalWrite(motor_in_2, LOW);
    }
    else {
      digitalWrite(motor_in_1, LOW);
      digitalWrite(motor_in_2, HIGH);
    }
  }

  if (increaseCount) {
    count++;
  }
  else {
    count--;
  }

  analogWrite(motor_en_1, count);

  delay(100);

  Serial.println(count);
}
Leave a comment